On a budget – Cheap furniture makeover
3-5 hours
$250 Materials
$100-250 Equipment
Drill
Screw driver
Painting kit
Spirit level
Painters tape
Wood paint
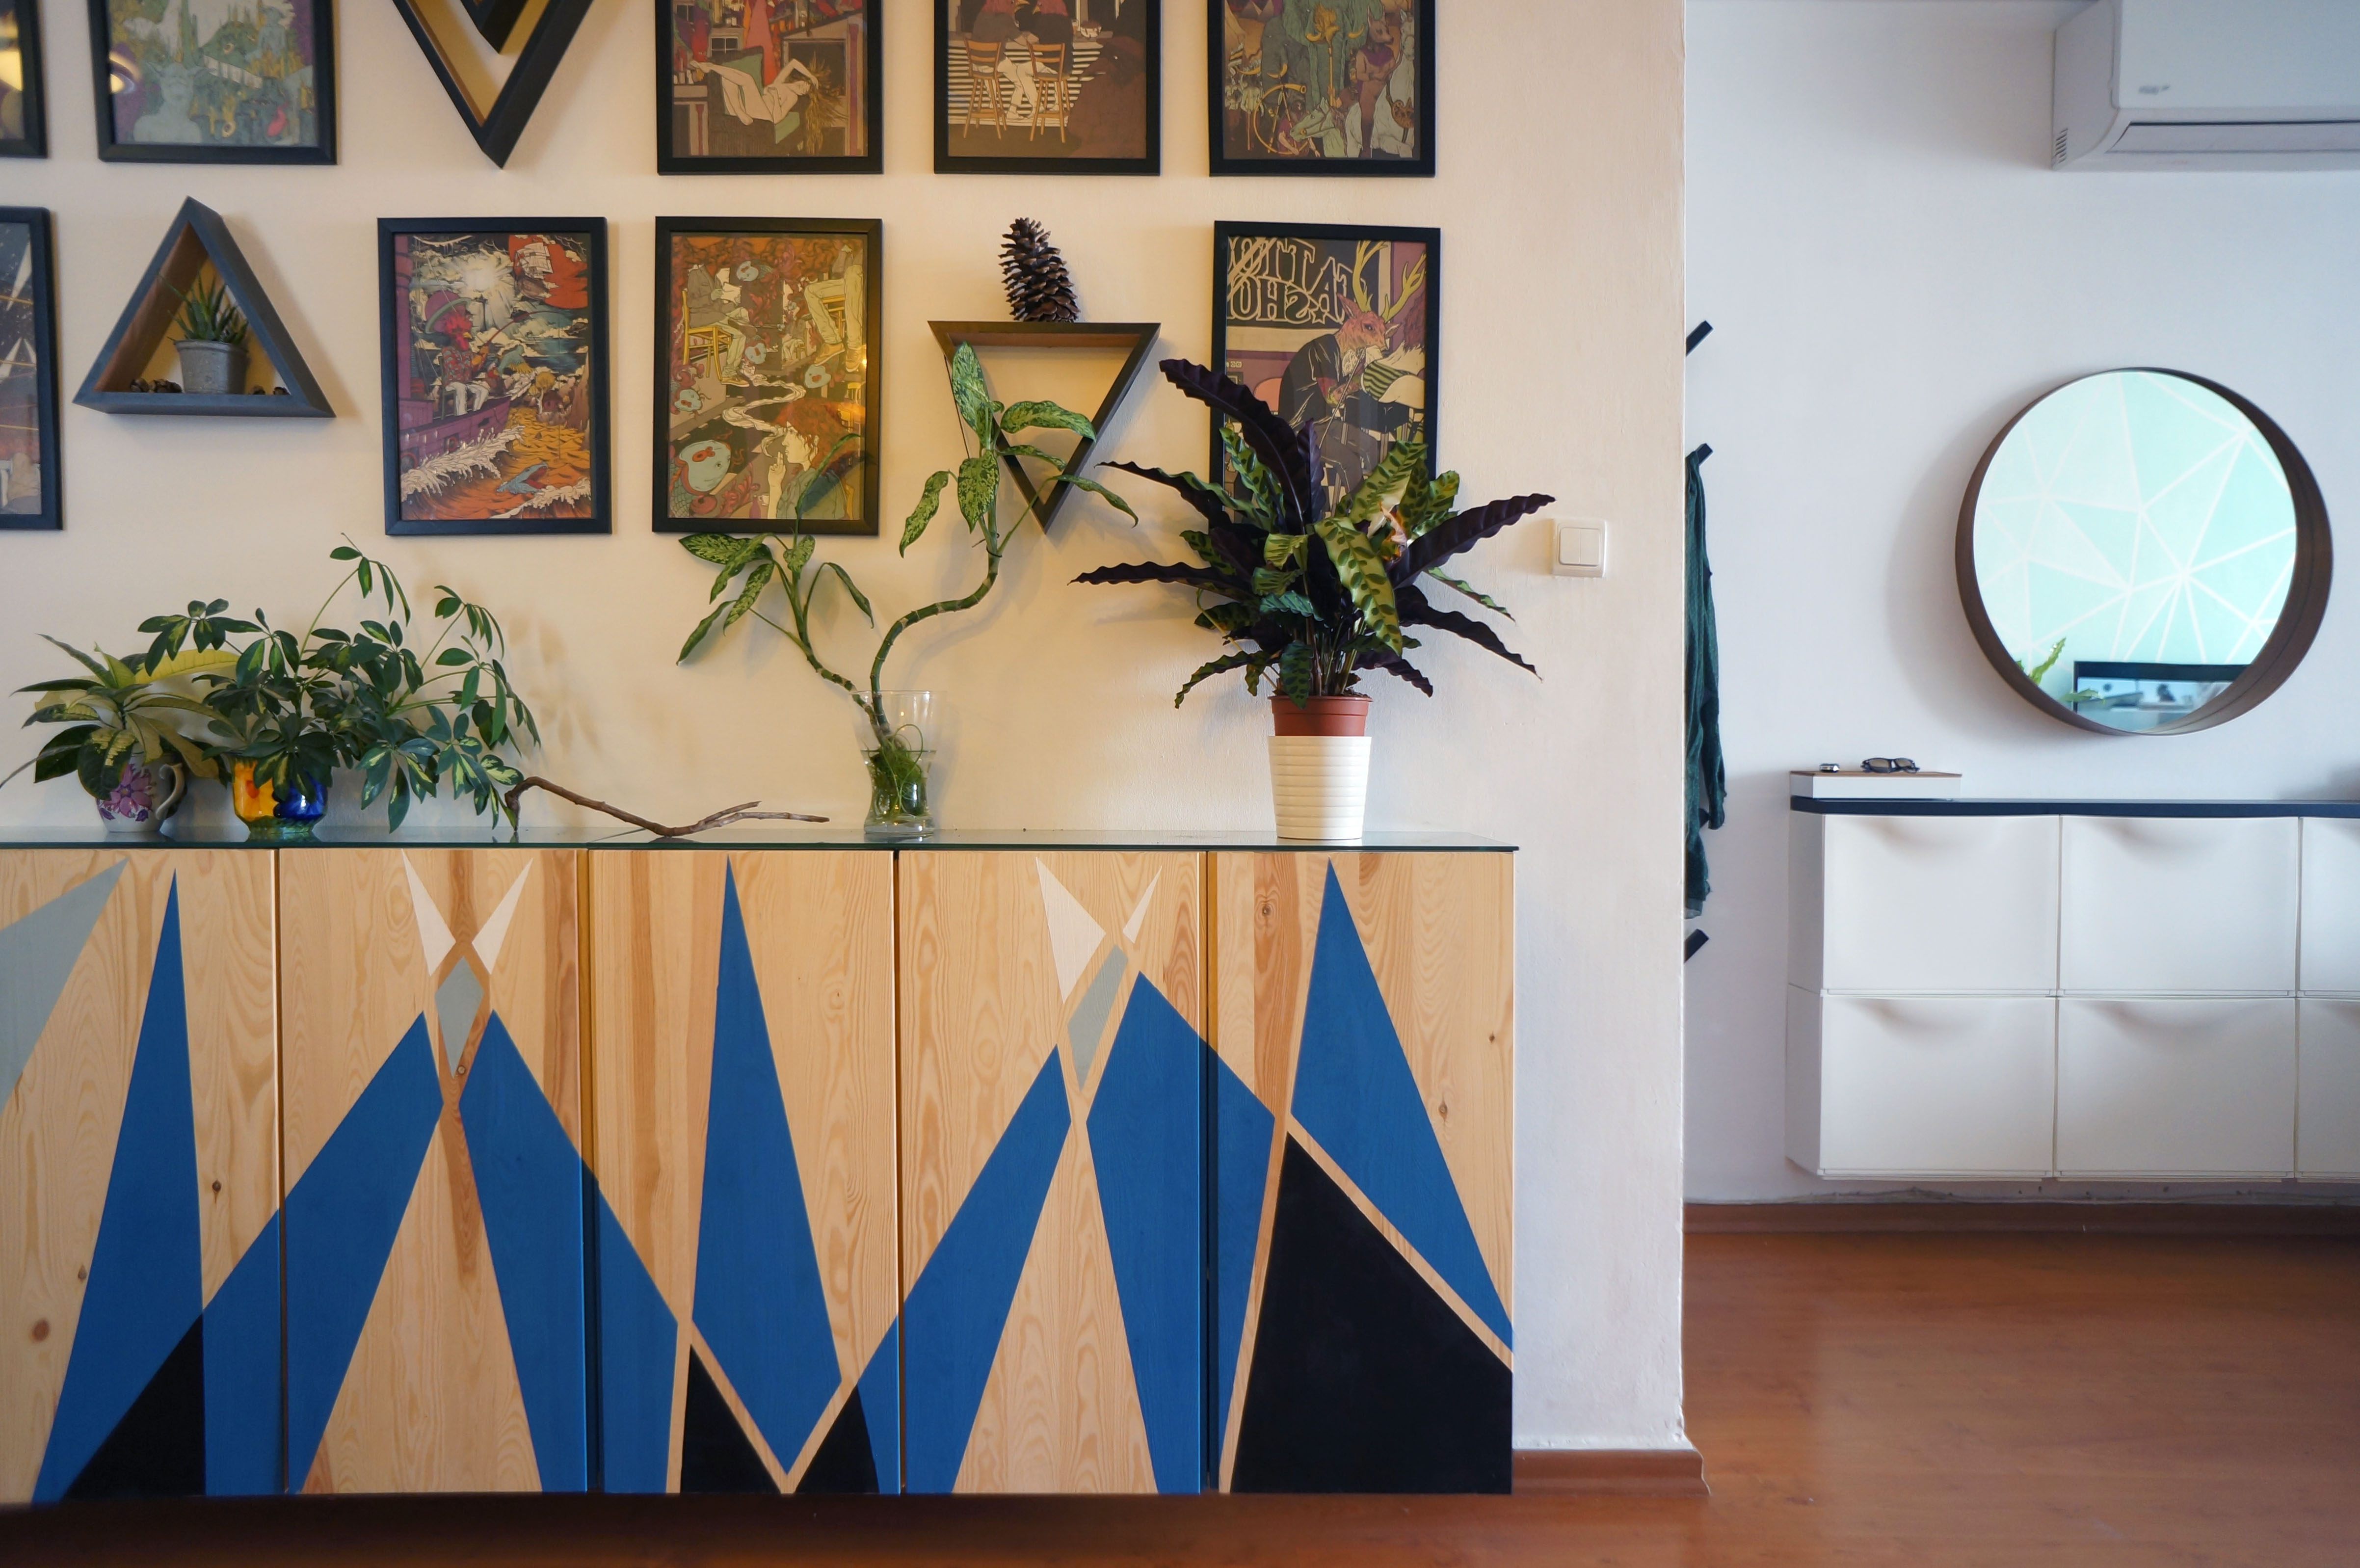
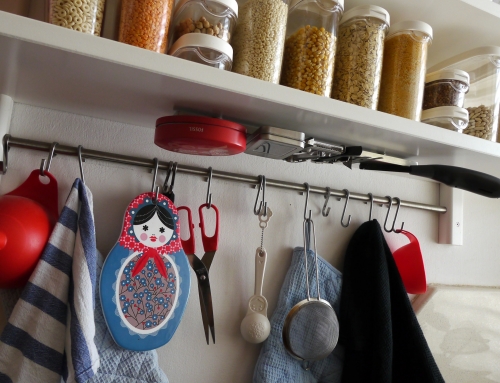
Our kitchen is tiny.
Having a tiny kitchen has it’s benefits, I admit. We buy less food that eventually being thrown away, but yet… I needed some storage place.
We had a free wall next to the dining table, but we could fit only a very narrow piece of furniture.
Browsing the shops, we couldn’t find anything that wasn’t too expensive, or just ugly.. and as always, we found ourselves in IKEA.
Have i ever mentioned how much i love IKEA? The only thing I like more than visiting IKEA are IKEA Hacks!

So here is your step by step guide:

Step 1: Buy the stuff you need
We bought three Ivar cabinet units for a reasonable price of $210. Each unit is 80 cm long and 30 cm thick. It gives quite a lot of storage place and it fits perfectly along the wall We intended to cover. The units have no finishing, which in my case is a benefit cause i could easily go wild with my ideas.
We decided to hang the units on the wall in order to make cleaning the kitchen easier and we bought some glass for the units’ top, also for practical reasons. Its easier to clean glass then wooden surface and in the kitchen dust and fumes tend to mix together to a sticky ugh.
The 3 cabinet units combined are 240 cm wide, so we divided the glass top to 2 parts of 120/30 cm, 4 mm thick. We took the cheapest glass type that has a greenish color, but if you’d like, you can spend more and buy the crystal clear glass. I paid 55$ for the glass top.
You will also need screws and screw anchors in order to fix the cabinets to the wall.
You should also buy paint and a paint brush. I like like the synthetic type for all kinds of paint.
Step 2: Prep, plan and clear your space
I must emphasize this obvious step! It’s definitely important to make sure you have plenty of room to assemble everything. Make sure you have enough space to spread out while working and assembling. Move away anything that might be an obstacle, be harmed or get dirty.
Step 3: Assemble the cabinets according to instructions
If its your first time assembling an IKEA piece of furniture, just keep calm.
First – Separate and count your pieces, make sure you really have all the pieces in order to complete the job. Since IKEA instructions are purely visual, separating and counting the little pieces will allow you to make sure you’re putting the right sized screw/dowel in the right place. I would also recommend to use an electric screwdriver (coming soon: my best VFM tools blog post).
It’s also a great tool to securely mount your new furniture to the wall.
Pay attention we will attach the doors only after the cabinet body is secured to the wall.
Step 4: Paint the Frame
I made a mistake. I mounted the units, before painting. We were desperate for storage, but my mind was empty of ideas, so we just decided to hang the units, and deal with it later. You can see in the video at the end of the post how I try to protect the wall with shits of paper, trying to insert them in the narrow gap between the wooden frame and the wall.
For the doors, it depends. In this design, the pattern is continuous across all the doors, so it was much easier to paint them after they were attached, but if you decide to paint them with a non-continuous pattern you should paint them at this stage.
For the painting, I recommend the synthitic brushes. The cheapest and of the best qulity I found are right here.
Step 5: Mount your Ivar on the wall!
The Ivar unit has two holes at the top for hanging. Take exact measurements of the holes from the bottom, from the sides and from one to another.
I wanted the top to be around 90-95 cm high, and to leave around 10 cm below so I had to make some simple calculations, and marked the needed holes of the first cabinet on the wall with the help of a level a meter and a pencil. Drill the holes, insert the screw anchors with the help of a hammer, gently.
Hang the first cabinet, tighten the screws, and then place aside the next unit in order to mark the holes, then drill etc.
Step 6: Attach the door
Attaching and adjusting the doors to be aligned can be tricky, but the principles are simple and with just a little practice you will become an expert.
Before you start adjusting any doors or hinges make sure you fit all your doors, then decide which ones need adjusting.
On a hinge, there are three adjustments:
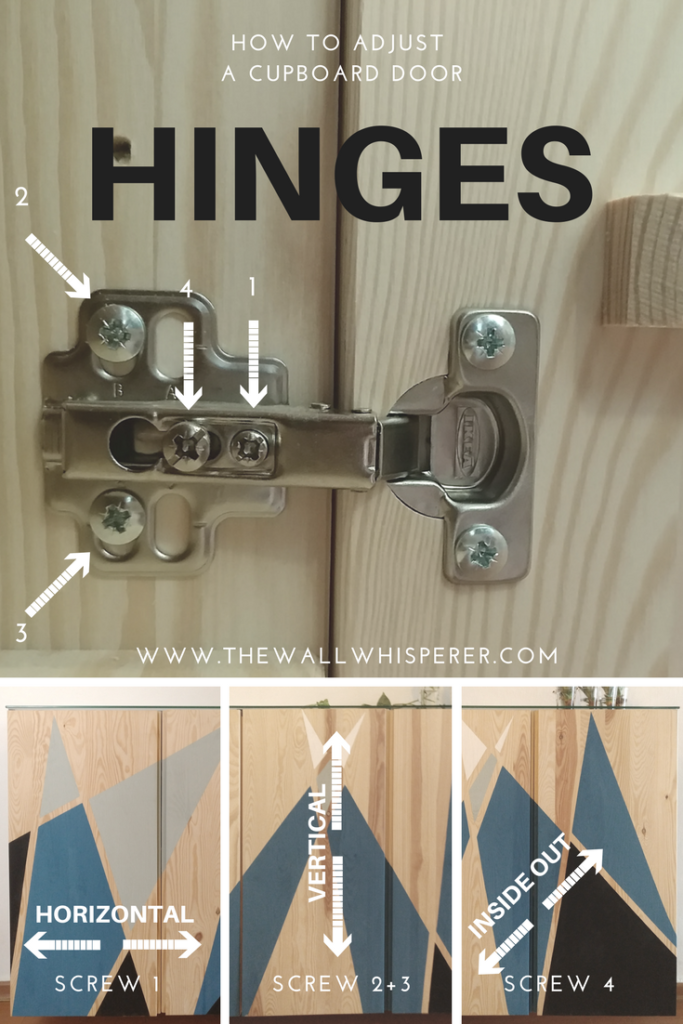
1. Side by side adjustment:
This is the most common adjustment required.
Use screw 1 to adjust the doors from side to side.
Turning the screw in a clockwise direction moves the door closer to the edge of the cabinet.
You can adjust both the top and bottom hinge to move the doors closer together or further apart.
2+3.Vertical adjustment:
Undo the two adjustable cupboard screws on both hinges.
They are usually in slotted holes which means you can adjust up or down by a few mm. Then tighten back up.
It is worth remembering though that with these two screws loosened that the door may drop slightly, therefore its worth supporting the weight of the door while you carry out this adjustment.
4.Front to back adjustment:
You can adjust the gap between the back of the door and the cabinet by adjusting screw 4.
What this does is physically moves the door forwards or backwards, enabling you to get an even gap, down the whole length of the door.
Having this gap too small is the most common cause of kitchen doors not closing fully – whereby the back of the door binds on the cabinet, preventing it from closing properly.
The ideal gap need not be any more than 1 mm.
Step 7: Mark the painting area with painters tape
As you can see in the video, I marked the pattern quite free handed, creating overlapping triangles, and trying to get each intersected 3 times. That allowed me to create the ombre/gradient effect by painting black at the bottom and white at the tips.
Step 8: Paint!
I used a synthetic brush and 2 types of paint, just because I preferred to use what I already had at home.
The black and the white colors are basically an acrylic water based paint with a silky finish. It’s quite cheap and I use it all around the house over various materials.
The blue and the turquoise are Americana DECOR chalk paint, with a chalky finish.
I’m not sure yet how I feel about chalk paint. The fact that it needs only 1 coating, maybe 2 for a perfect cover is definitely a pro, but I really don’t like the rough finish. In most projects i have to cover it with varnish top coat, to protect the paint which get stained very easily. In this case i decided to leave it as is. It’s been six months and in the meantime it didn’t catch any stains.
For painting the frame i used a small furry long haired paint roller. Usually, on smooth surface you can use short hair roller also. For the frame edges and for the triangles I used my favorite weapon of choice – The Nylon ginger paint brush. I usually buy those from aliexpress. They are cheap, easy to clean and the finish is perfect.
Step 9: Peeeeel..
You already know it’s my favorit part.
As soon as the paint is dry to touch, start peeling gently and slowly.
If you wait too much, the paint will harden on the tape, and you will be pulling out pieces of the wall when peeling.
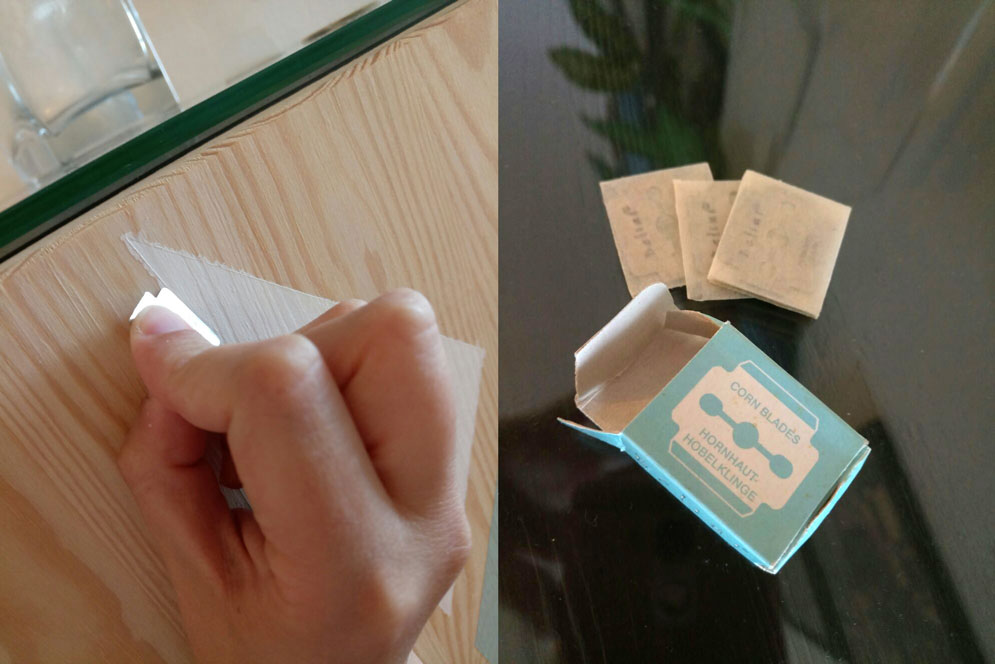
Step 10: Finishes and touch ups
Even though we used a painters tape and we tightened it before painting, it’s almost impossible to avoid spill and smudges. On a wooden surface it’s easy to use an old style razor-blade to scrape the paint but it’s also possible to use sand paper very gently.
Step 11: Enjoy your Hack, and go ahead to the IKEA catalog to find your next project.
see you soon in my next post! Don’t forget to subscribe for updates!
I am amazed at your work. I know you say it’s a hack and that it’s easy, but the painting on that piece looks awesome! Great job!
Love Ikea hacks! This is giving me ideas already!
So fun and interesting! I’ve always thought I’d be so into this kind of thing if I can ever find more time. Thank you for sharing!
Amazing hack! Great result! looks really professional. Kudos!
Is it possible to get the gap between the doors completely closed.
yes, you need to play with the hinges, but it’s possible.
I love those triangle shelves! Where are they from?
I actually asked a local carpenter to make them for me.
Hi! What did you use to attach to the walls? Suspension rail or just screws?
Hi, Just screws.
Great post Shuly. I love a good IKEA hack. I did something similar in my kitchen with Billy Bookcases. I love the video ? Sharing ?
Thanks!
Where did you get the glass top? We mounted 4 Ivar cabinets together and can’t seem to figure out what to do on top ?
Hi! I got it from a local Glazier shop..
Just screws to attach? From where? I am affraid the wood is to fragile?
You mean how it’s attached to the wall?
Yes, by screws according to instructions.
Any chance you could let me know how you actually attached this to the walls I cant see anything in the instructions. Did youscrew through the cardboard back bit? Or buy brackets to attach it to? Please help!!