Patterns, Castors, and Pulls
4-6 hours
$140 Materials
$50-250 Equipment
Drill
Screw driver
Painting kit
Painters tape
Wood color
Wood glue
Glass top
Wood boards
I’m so excited to publish this blog post because so far, I think this is my favorite project.
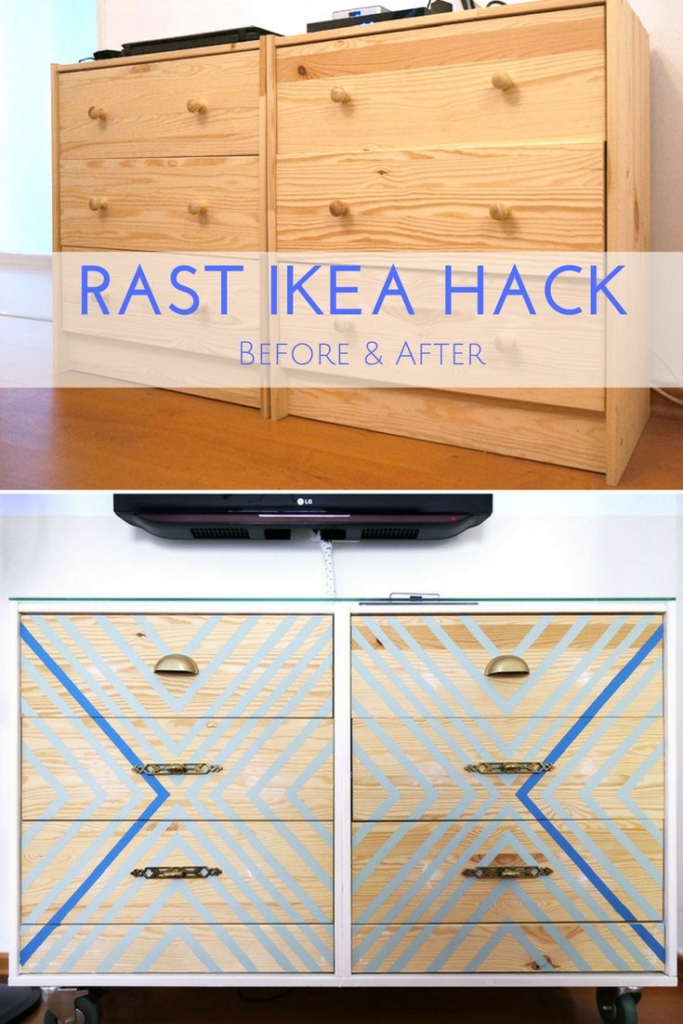
In this project, we took two super cheap RAST dressers and made something completely new.
Unfortunately, IKEA stopped selling this super cute dresser in 2018, but you can find the very similar GURSKEN that you can apply to most of the ideas in this blog post.
Generally speaking, the Rast dresser seems to be the DIYer’s favorite project. And it’s clear why:
1. It’s cheap! only 35$
2. It’s quick to assemble
3. It’s free of finish so it makes it really easy to redress
5. It’s small enough to fit most spaces
6. There is no number 4
We got it for our tiny bedroom, because nothing else could fit. This dresser is 30cm thik and therefore very suitable for tight spaces.
Long before this project was planned, I fell in love with these beautiful brass handles (more images in the end) and bought them, so when I got the dressers I already had the pulls.
Unfortunately, it looks like they have been out of stock for a while, but the seller has many other beautiful models.
The delivery took a while but when the beauties finally arrived we started hacking.
For this project you will need:
1. New handles or knobs, although it is possible to keep the originals or just paint them.
2. 4 castor wheels. We used 4 wheels with breaks, but it’s ok if you use only 2 breaks or even just simple legs.
3. Two pieces of wood: 1.8 mm X 58.2 cm X 8.5 cm for the toe kick
4. One board of 30 cm X 124 cm or 3 of 8-10 cm X 124 cm
5. 4 mm glass top 30 cm X 124 cm
6. All the general materials and equipment mentioned in the title.
And here we go:
Step 1: Assemble
Assemble the dressers according to the instruction, but do not insert the drawers yet.
Step 2: Join the dressers
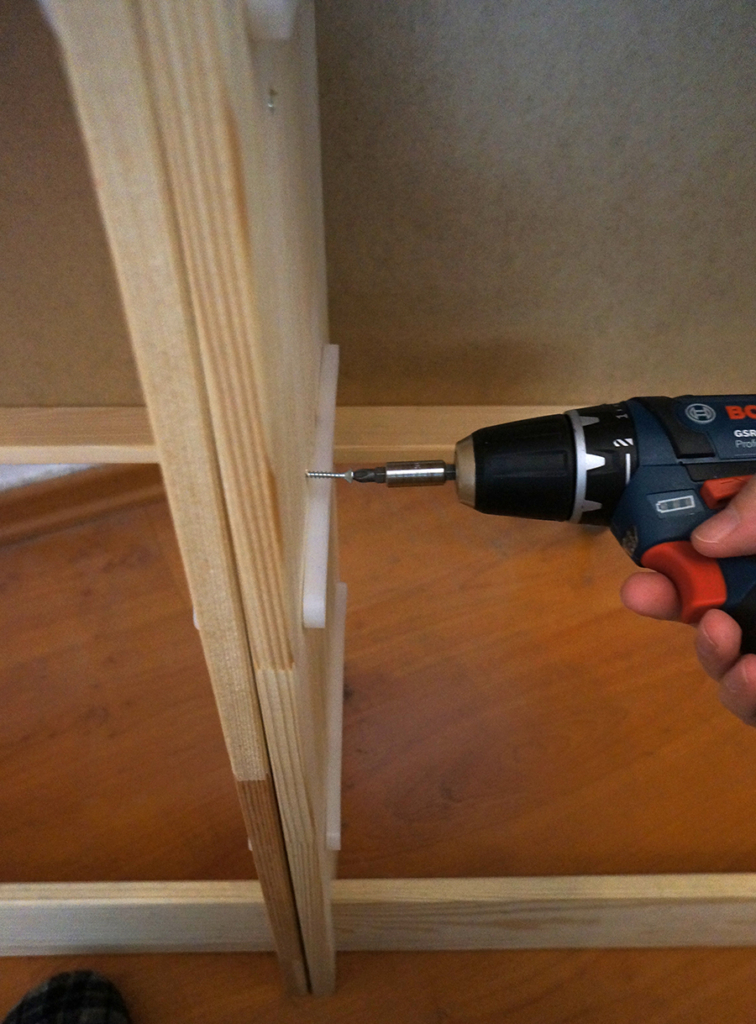
Join the two dressers together. I used screws. Pay attention and place the screws above or below where the drawer shout fit when it’s closed. Two screws on top and two on the bottom should be enough. Choose screws less than 2.8 cm long (the thickness of the two side panels).
Step 3: Add a base
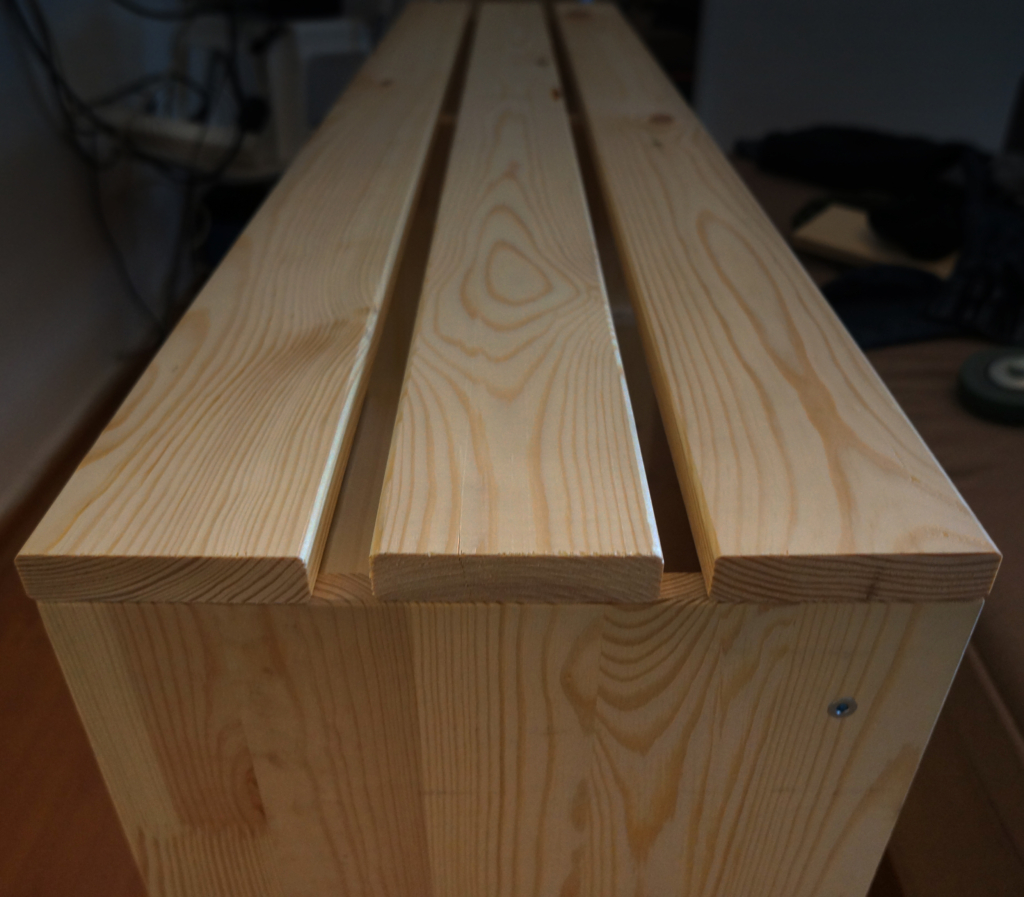
In order to attach the wheels and to create a square-shaped frame to unite to two dressers, we need to add a base.
Place the board or the boards as a base on the bottom. Because a full board was too expensive in our local wood store, we decided to take 3 cheaper pieces.
We screwed them to the edges of the panels, and you can hardly notice them from the sides.
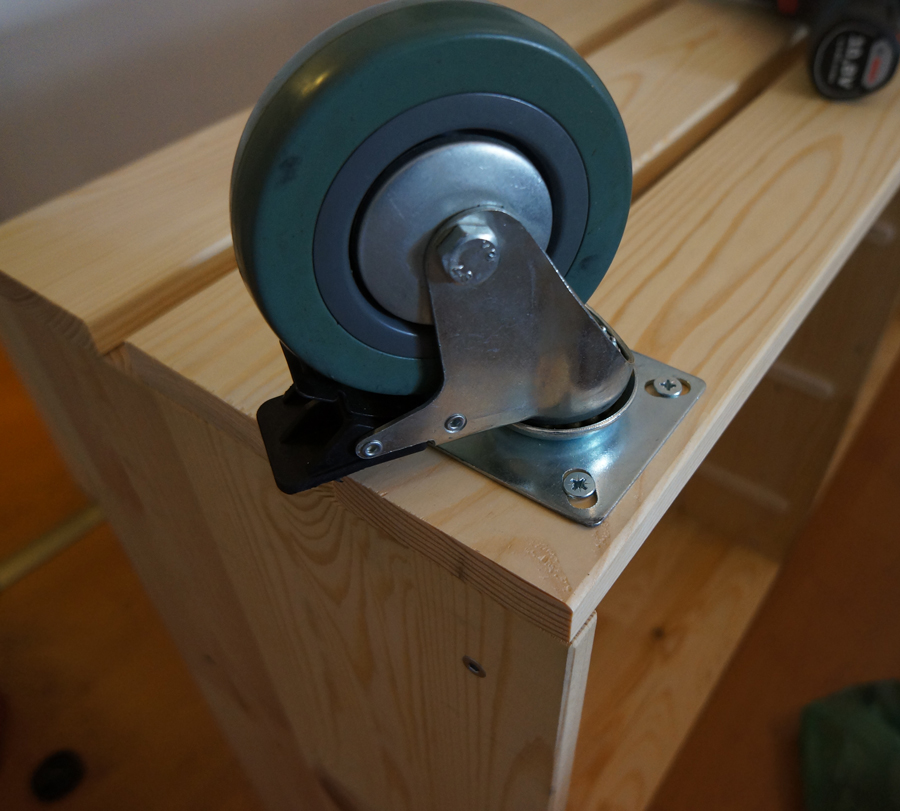
Step 4: Add Castors
Attach the castors to the bottom with screws.
This step is obviously not mandatory, but it’s probably the most practical decision we made when planning this hack.
The castors allow us to move the chest easily and they also lifted the chest just a bit adding lightness and more delicate character to the overall look.
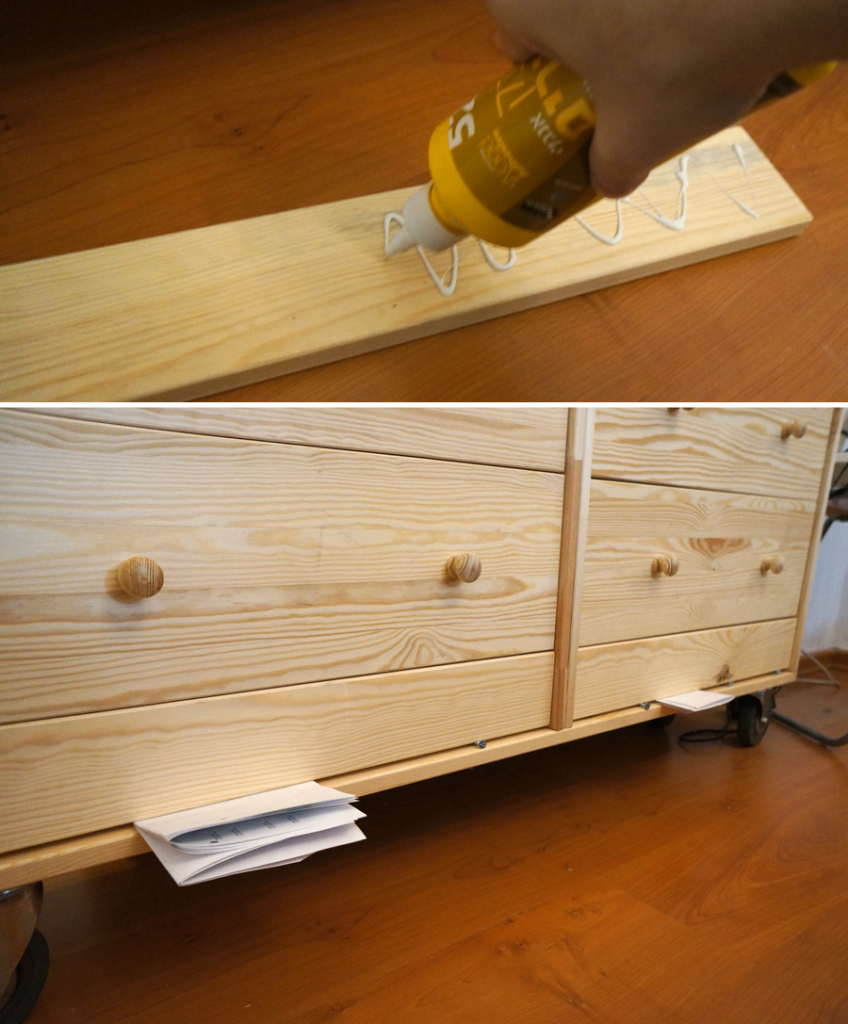
step 5: Fill the toe kick
Now let’s take care of the toe kick.
To keep the front aligned at the same level, we will use the two short boards, and we will glue them in place.
At the bottom, we placed folded paper to help center the panel so that grooves of the same thickness are created on each side.
Step 6: Fill the holes
Since in this project, we will replace the pairs of knob handles with central pull handles, we should seal the existing holes with wood putty. Apply the putty and wait for it to dry then smooth it with sanding paper.
On this dresser, as you can see where the light stains are, I used white-colored putty. Before I started painting, I meant to paint it with an opaque color, but at the last minute, I changed my mind and decided on a striped pattern. Please, don’t be reckless like me! plan ahead and pick a compatible shade of putty for your final design.

Step 7: Paint the frame
I painted it white after I inserted the drawers and locked them inside, but it’s actually easier to do it when they are out.
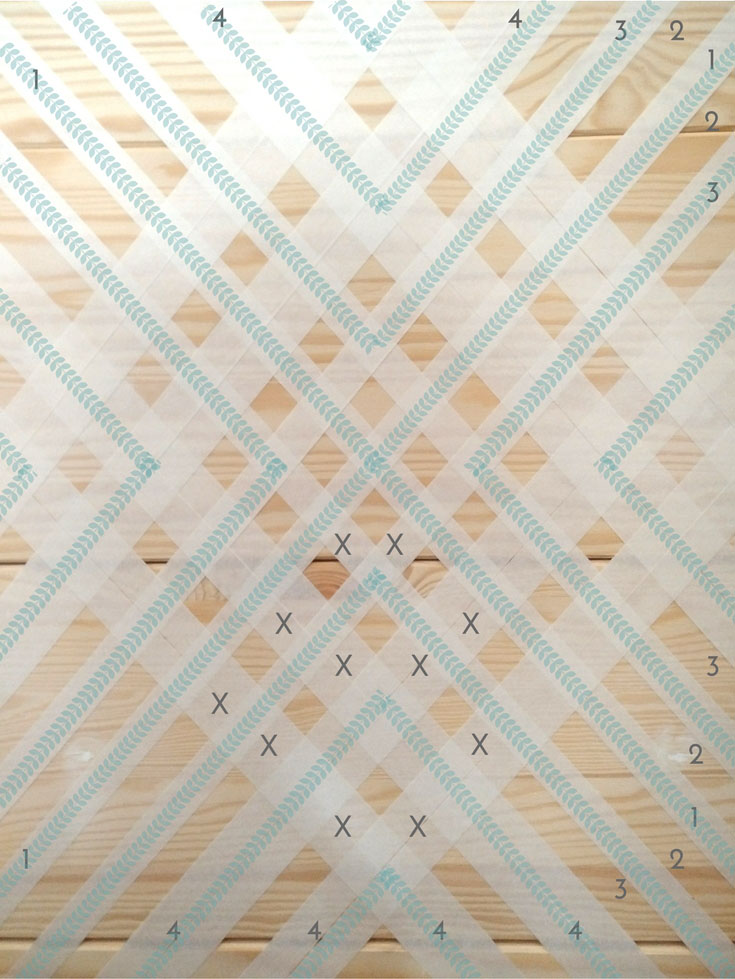
Step 8: Create the pattern with masking tape
Insert the drawers and make sure they are all in the right place (each drawer can be slightly different).
Now we start the really fun part.
As you probably noticed by now, if you follow my blog (and if you don’t please do) I’m a real masking tape addict, therefore it was very much predicted it will star in this project also.
First I created a big X with the tape between the corners (1). Then I added strips from above and below (2), and then again (3), and then I took away the middle strips (2) keeping it exposed to the paint to come. I continued the same process from the center outside until the entire front was covered with masking tape stripes.
In some places (4) I used 2 strips together in order to get thicker spacing.
Then I started to cut out the little pieces in between in order to create the triangles. In The image you can see in blue the outline of the strips that should remain before painting. I’m sorry the image is cropped that way, I forgot to take a pic of the full front.
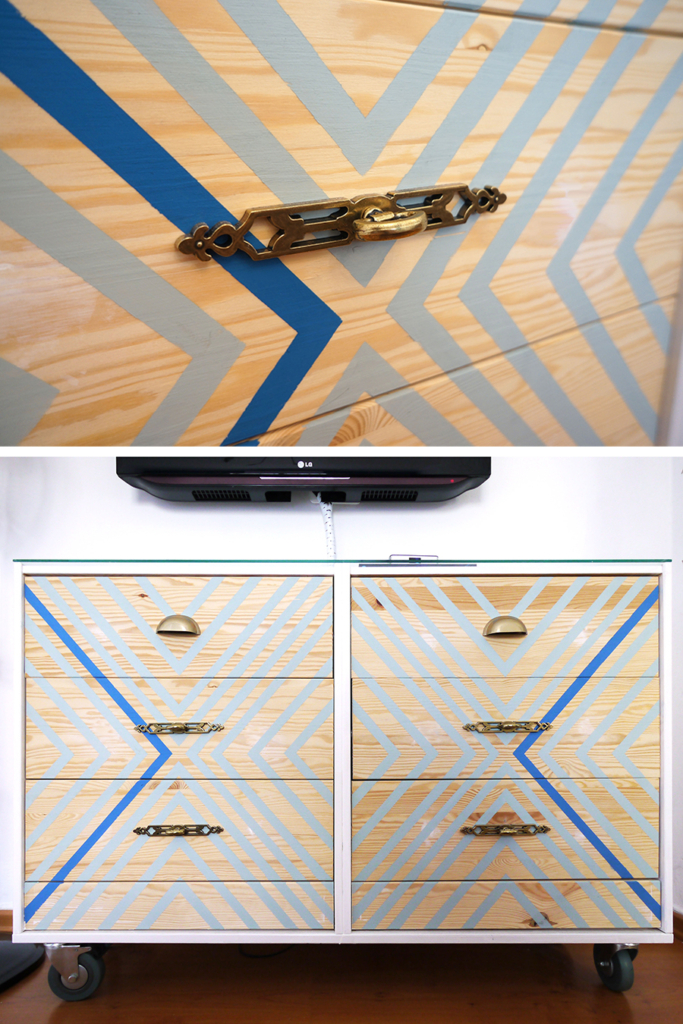
Step 9: Paint
Start painting the stripes!
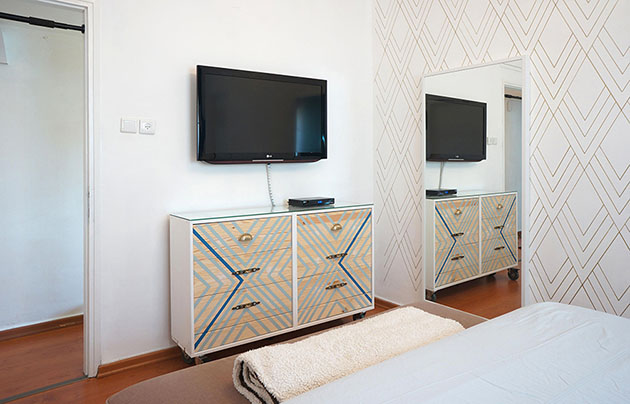
I used a synthetic brush, and Americana DECOR chalk paint, and you can use whatever type of paint you’d like as long as it’s suitable for wood. I chose to paint all the strips with light turquoise paint and the external strips with dark blue.
Step 10: Peel
My favorite part.
As soon as the paint is dry to touch, start peeling gently and slowly.
If you wait too much, the paint will harden on the tape, and you will be pulling out pieces of the dry paint when peeling.
Step 11: Add the pulls
As I mentioned, there are 2 types of pull here. On the top drawers pulls from IKEA, and on the rest drawers I used there art deco style handles.
Mark the place for the holes accurately, use a ruler and a level, and only when you are absolutely sure, drill the new holes. I for example, wasn’t so accurate with the upper handles and if you look closely, you will see…
After you drilled the perfectly leveled and centered holes, attach the new handles.
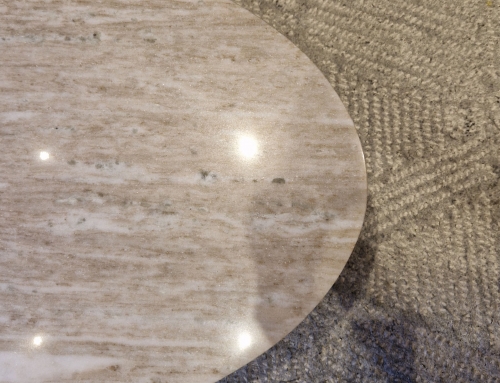
Step 12: Place the glass top
And that’s all! we’re done!
Let me know if this post inspired you to hack a Rast.
See you in the next blog post.
Whyyyyy
Why the video of the procedure is on speed motion???
Hard to understand
I know its hard to see…
I’m sorry! I just don’t have the equipment or the skills to produce high-quality tutorial videos yet.
I hope to get better soon.
If you want to watch video in slow motion, simply open it in YouTube or on a computer. If in the YT app, chose the three dots in top R corner, choose playback speed, and you can slow down or speed up from there. Hope that helps. ????